How To: Build an Express GraphQL API in TypeScript

Initilizing the project
We'll be working in a terminal - be it the standalone teminal - or the integrated terminal in your text editor.
-
Initialize a repository in an empty folder, say, we call ours
express-gql-api.:mkdir express-gql-api # enter the project folder cd express-gql-api -
Initialize the folder as a node and git project:
npm init -y git init -
Initialize a Readme Having a Readme is essential for any project - this is the document people will see when they come across your repository in Github.
We'll start off with a simple description but feel free to add more information about your project as you go.
bash echo '# Express GraphQLAPI in TypeScript' > Readme.md -
Initalize the source directory This is where we will place our
.tsfilesmkdir src
TypeScript and Project SetUp
TypeScript is usually compiled to JavaScript and which is the code that is actually run. Assuming you already have the TypeScript installed, we will write the configuration file that tells the TypeScript compiler how to compile out files into JavaScript:
-
Initialize a
tsconfig.jsonfile in your root directory from the terminaltsc --init -
. Working in the text editor, we will set the following compiler options:
-
"rootDir"- this is the directory where the TypeScript compiler will search for.tsfiles to compile into JavaScript. In our case, the root directory is thesrcfolder:{ "compilerOptions": { //... "rootDir": "./src" //... } } -
"outDir"- this is the directory where the compiled JavaScript will be placed: In our case, we will call our output directory"dist"{ "compilerOptions": { //... "rootDir": "./src", "ourDir": "./dist" //... } }
-
-
Finally, we will edit the package.json file so that we have a smooth time running the project. Add the following line under script in
package.json:"scripts":{ //... "start" : "nodemon dist/index.js", //... }
This is the basic setup that we need before we get started
SetUp
We will be working with a few packages that we need to install:
express- since we are buiding an express serverexpress-graphql- this is the express middleware that will allow us to build our graphQL endpointgraphql-tools- A package that helps build the GraphQL Schemamongoose- The library that will allow us to connect to a MongoDB database
Before we jump right into installing the packages, let's create a .gitignore file at the root folder and add node_modules so that git doesn't track npm packages:
echo node_modules > .gitignoreTo install all the tools, we can do so in one command:
npm install -s express express-graphql graphql-tools mongoose nodemonBefore we start writing some code, we need to have our TypeScript compiler running so that we can generate the JavaScript files as we go. So, in a separate window, run the typescript compiler with a watch flag:
tsc -wAnd now we are ready to build our api
The API 🥑
Let's add some files to our file structure first:
📦express-gql-api
┣ 📂src
┣ 📜.gitignore
┣ 📜Readme.md
┣ 📜package.json
┗ 📜tsconfig.jsonHowever, let's add some files in the src folder first
Create an empty directory in the src folder called data - this is where we willl be placing out database connectors, types, schemas and resolver files.
Create the following files to match the following structure:
📦express-gql-api
┣ 📂src
┃ ┣ 📂data
┃ ┃ ┣ 📜db.ts
┃ ┃ ┣ 📜resolvers.ts
┃ ┃ ┣ 📜schema.ts
┃ ┃ ┗ 📜types.ts
┃ ┗ 📜index.ts
┣ 📜Readme.md
┣ 📜package.json
┗ 📜tsconfig.jsonSchema Definition
GraphQL requires a schema to be defined. A schema what graphQL uses to know what type of data to expect.
We will define the schema in the schema.ts file in the following way: We will use our graphQL endpoint to create and query a user. So we need
to define:
-
a
usertype -
a
UserInputinput - that has the same structure as theUsertype -
a
Querytype - where we will define all the queries -
a
Mutationtype - where we will define the mutationsimport { resolvers } from './resolvers' import { makeExecutableSchema } from 'graphql-tools' const typeDefs = ` type User { name: String username: String } input UserInput { name: String username: String } type Query { getUser(username: String): User } type Mutation{ createUser(user: UserInput): User } ` // Build the schema and export const schema = makeExecutableSchema({ typeDefs, resolvers }) export { schema }
Definine the type - type.ts
export class UserType {
constructor(public name: String, public username: String) {}
}Connecting the Database
Setting up the MongoDB instance 🗄️
Before we move into this step, we will need to first set up our database. One can do so by following this process:
- create a free MongoDB account here
- Create a free cluster.
- Once the cluster has been created, click
connectto your cluster. Further instructions can be found here - You will need to add a connection IP address - typically your own IP for development locally
- create a database user with a username and password - You will need this to login to your database later
- Proceed to choosing a connection method - in our case we will use the
connect your applicationoption - This will lead us to a page to select our driver and version - which in our case should be
Node.jsVersion3.6 or later. - Copy your connection string somewhere safe that you can edit. You will notice that the username is included in the connection string but you will need to replace the
<password>with your password and also pick a name for our database
Assuming our username wasamaniwith passwordAEDPfTeq61WH04NL, and we want our database to be calledbliss, our connection string would look like:
mongodb+srv://amani:AEDPfTeq61WH04NL@cluster0.9ntf0.mongodb.net/bliss?retryWrites=true&w=majority- Save this connection string somewhere where you can reference it later as we will need it when running our program.
Connecting to the Database programmatically - db.ts
In the db.js file, we will import mongoose and then define a new schema for the database - in our case, the only schema we will need is the user schema.
We will then create a new mongoose model that will be exported for use to query the database. Notice that we have set the connectionString
variable to an environment variable - this is safer than pasting the connection string right into your code because it makes your database vulnerable.
In our case, will set the connection string to an environment varible when we are ready to run the application.
import mongoose from 'mongoose'
const Schema = mongoose.Schema
// @ts-ignore
const connectionString: String = process.env.MONGO_DB
// @ts-ignore
mongoose.connect(connectionString, {
useNewUrlParser: true,
useUnifiedTopology: true,
useFindAndModify: false,
useCreateIndex: true
})
const UserSchema = new Schema({
name: String,
username: String
})
const User = mongoose.model('User', UserSchema)
export { User }Declaring the resolvers - resolvers.ts
The resolvers are the functions that are run whenever the endpoint is run - so you need to define a function for each query and mutation as we will do below:
import { UserType } from './types'
// import the User from the database
import { User } from './db'
export const resolvers = {
Query: {
//@ts-ignore
getUser: (root, { username }) => {
return User.findOne({ username: username })
.then((user: UserType) => {
return user
})
.catch((error: any) => {
console.log(error.message)
})
}
},
Mutation: {
// @ts-ignore
createUser: async (root, { user }) => {
const newUser = new User({ name: user.name, username: user.username })
await newUser.save()
return newUser
}
}
}Piece the pie together 🥧 - index.ts
Our index.ts file is where all the majic happens. We will begin by importing the necessary packages and instantiating a new express app. Then we will initialize the connection to the database and attach the grapqlHTTP middleware function with our schema and graphiql - which we can use to explore the api:
import express from 'express'
import { graphqlHTTP } from 'express-graphql'
import { schema } from './data/schema'
// Initialize app
const app = express()
require('./data/db')
// the graphQL endpoint at /graphql.
app.use('/graphql', graphqlHTTP({ schema: schema, graphiql: true }))
app.get('*', (req, res) => {
res.json({ message: 'Welcome to the api' })
})
const PORT = 7000
app.listen(PORT, () => {
console.log(`api is running on port ${PORT}`)
})Running the server
Before we run the server, we will need to add our mongoDB connection string to the environment variables:
export MONGO_DB='mongodb+srv://amani:AEDPfTeq61WH04NL@cluster0.9ntf0.mongodb.net/bliss?retryWrites=true&w=majority'Now, we are ready to run the server 🚀
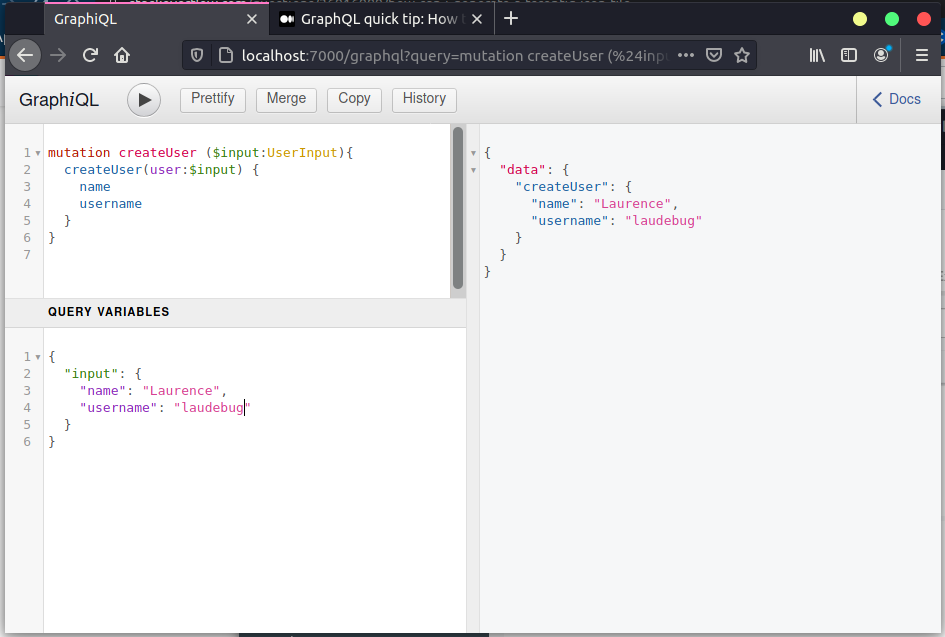
npm run startAnd we can run the server and explore our api. Here's an example of a mutation that you can make with the api:
Mutation
We can add a user by making a mutation on the api:
mutation createUser ($input:UserInput){
createUser(user:$input) {
name
username
}
}We can then pass in the user input using the query variables:
{
"input": {
"name": "Laurence",
"username": "laudebugs"
}
}Here's how the mutation looks like:
Query
If we were to then ask the api for a certain user, we can make the query by:
query {
getUser (username:"laudebugs"){
name
}
}You can check out the repo here
Common Issues that you may run into:
- IP isn't whitelisted: If you're running into this issue, it may be the case that your ip address has changed and you need to add your current IP to be able to connect.
- Could not find a declaration file for 'express'
Install the declaratio file for
express:
npm install --save-dev express